AI Can't Write Korean? The Complete Guide to Text Rendering Strategy
1. The Problem: Why Can't AI Write Korean Properly?
The latest AI image generation models — Google NanoBanana, GPT Image, Midjourney — produce stunning visuals. But they share one critical weakness: non-English text rendering.
While English text is handled well, non-Latin scripts like Korean, Japanese, and Chinese reveal clear limitations. When you ask the model to include complex Korean words like "뙤약볕" (scorching sun), "외곬" (one-track), or made-up proper nouns like "늬읏" and "낢이섬" in an image:
- Characters break — Glyphs are generated with non-existent consonant and vowel combinations.
- Similar but wrong characters appear — "뙤약볕" becomes "되약볕" or completely different characters.
- Layout collapses — Text size, spacing, and alignment in the image fall apart.
Let's See It in Action
Try generating an image with this prompt:
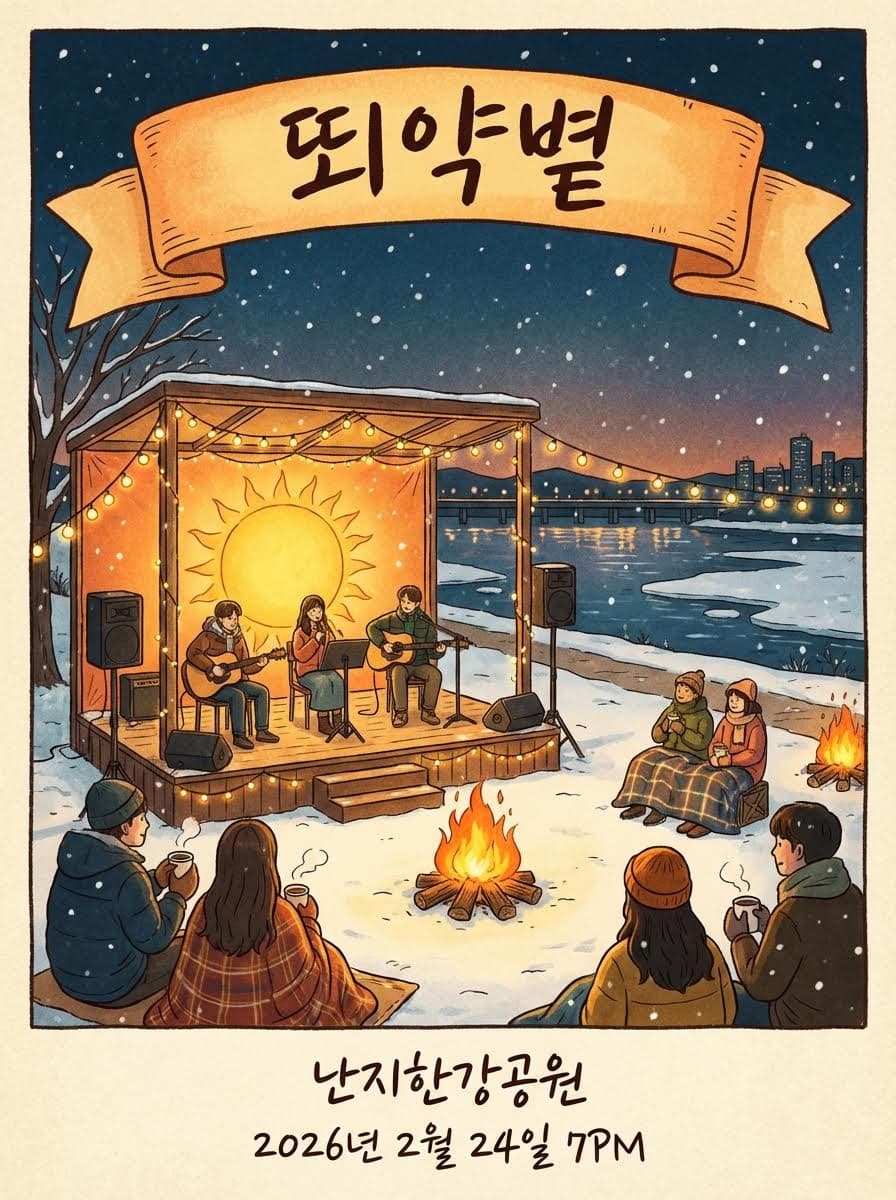
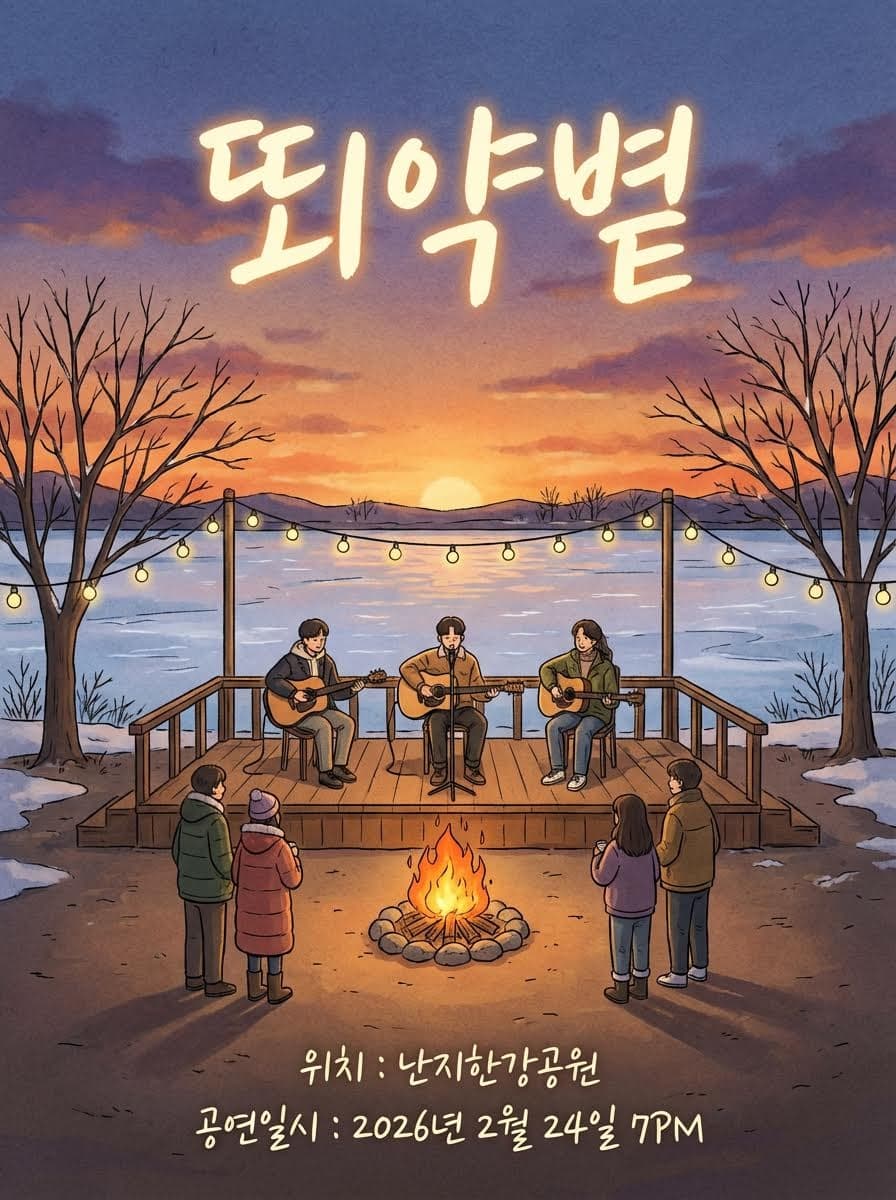
Create a concert poster for a band called '뙤약볕' performing at Nanji Han River Park on February 24, 2026 at 7PM. Use a winter feel with the river in the background.
Feed this into a standard AI image generator and you get results like these:
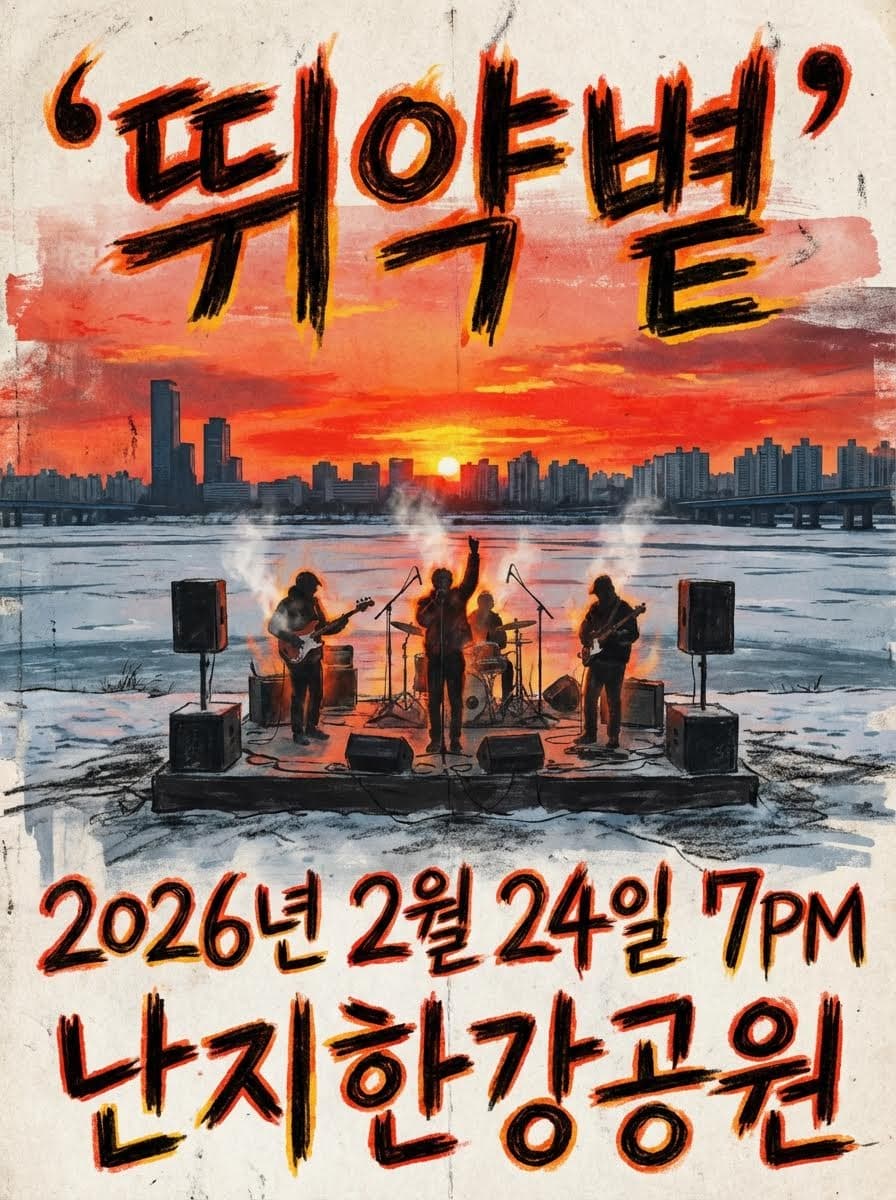
The designs look decent, but the text is completely illegible. These images are unusable in practice — a fatal flaw for any design where text is essential, such as posters, banners, and social media content.
2. The Strategy: "Don't Let AI Write — Let It Trace"
The core idea is simple:
Don't let AI recognize text as text — make it recognize text as an image!
This strategy has 3 steps:
- Text Extraction — Extract text from the prompt that should appear in the image. Detect the script to prepare a "picture" for the AI to reference.
- Text Canvas Rendering — Render the extracted text with an appropriate font to create a pixel-perfect text image.
- Final Image Generation — Pass the rendered text image as a reference, so the AI reproduces the text accurately while completing the design.
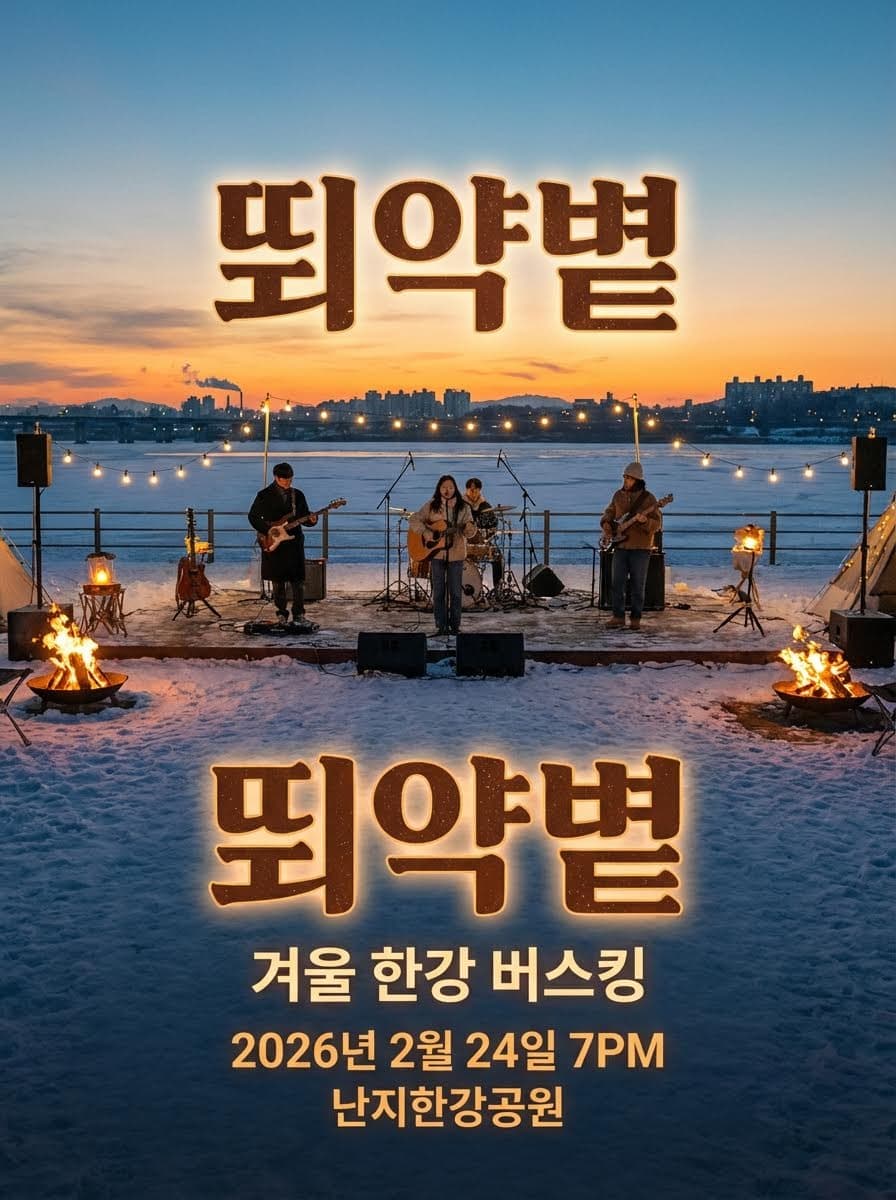
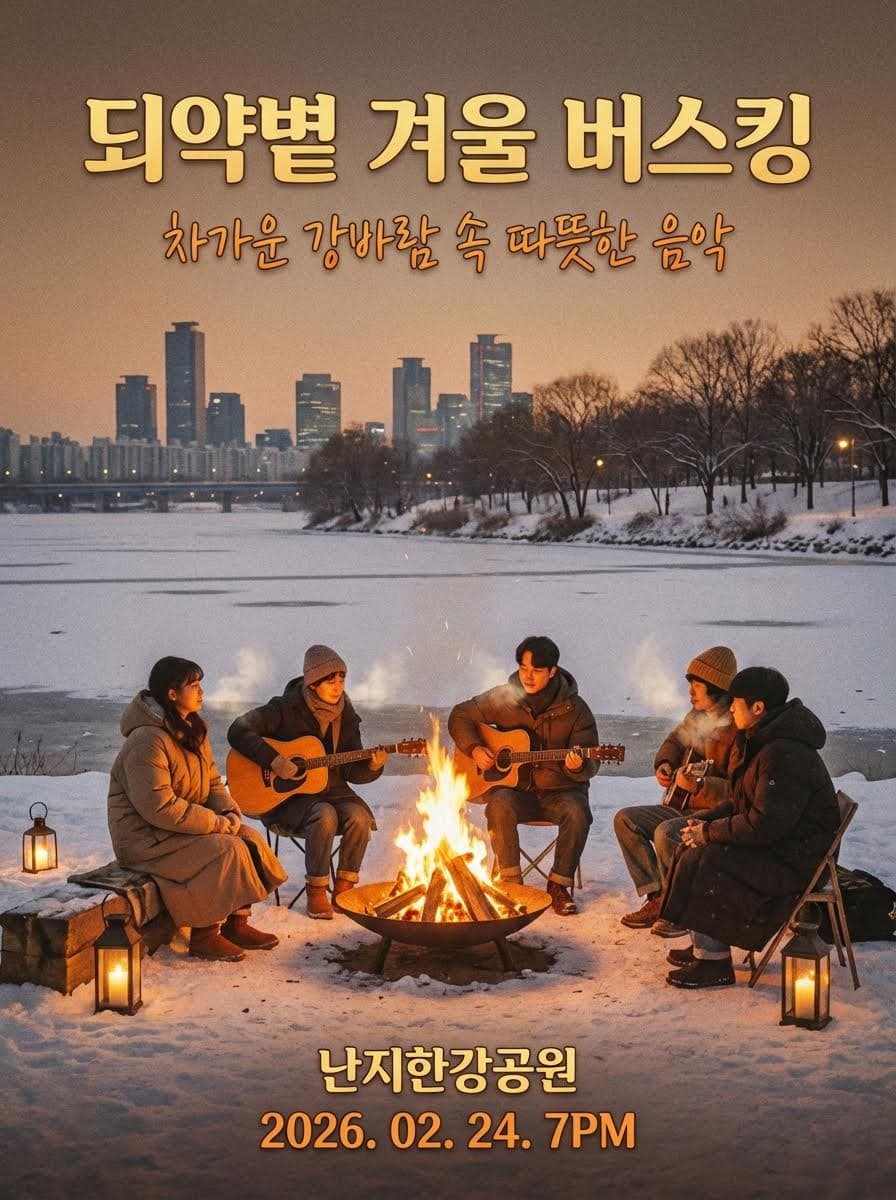
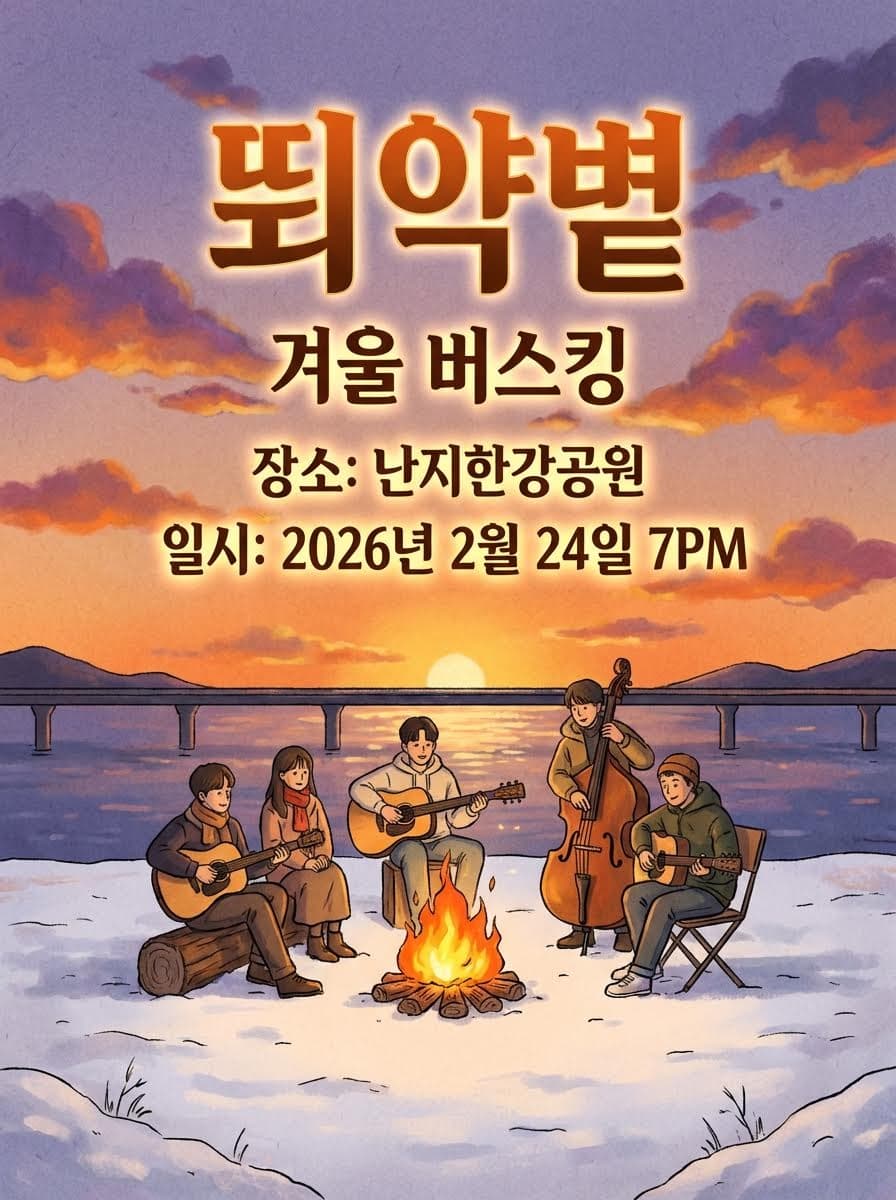
3. The Result: Reliable Text Rendering
Applying the strategy above to the same prompt yields results like these:
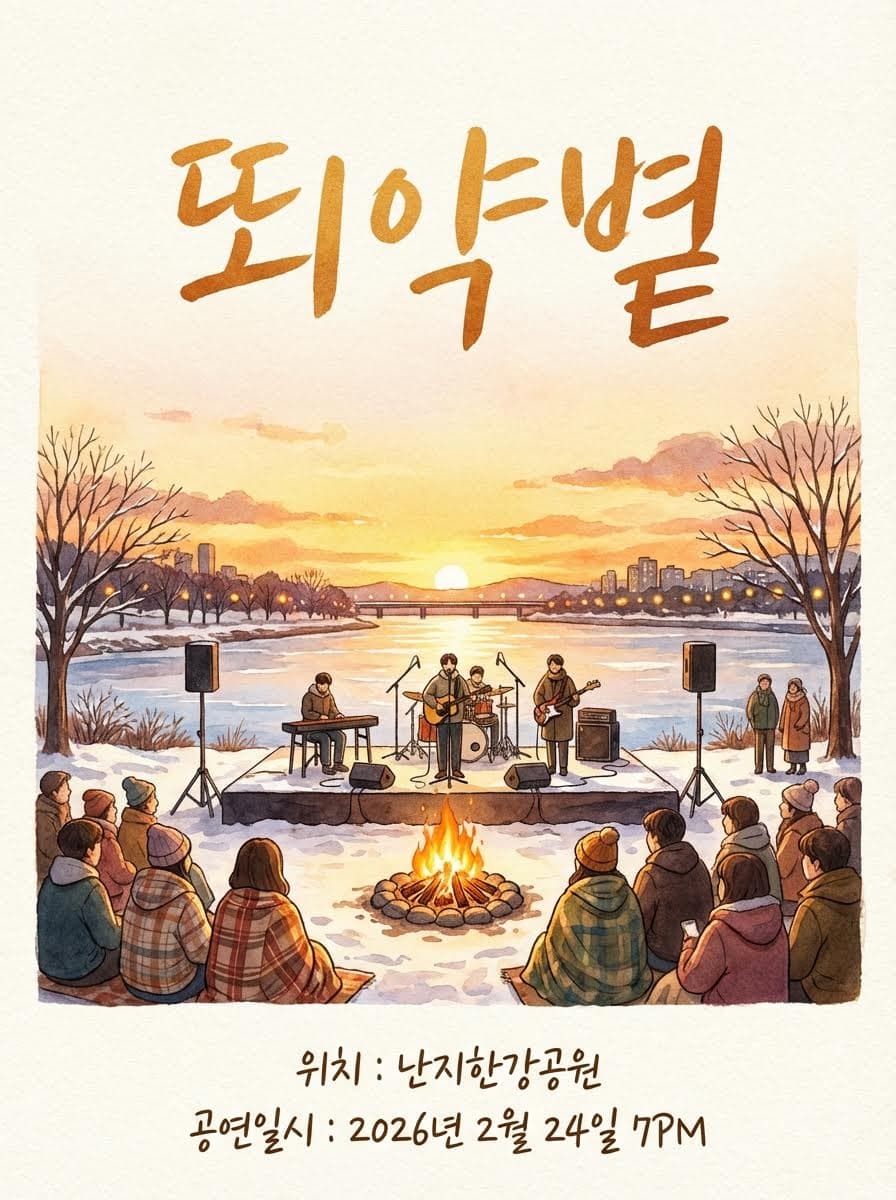
The previously unrenderable "뙤약볕" text is now rendered correctly across all images. What was once unusable is now production-ready.
Let's walk through each step to see how this works.
4. Step-by-Step Breakdown
Text Extraction
An LLM is assigned the role of a text rendering expert to analyze the prompt. It determines which text elements need to be rendered and checks whether any contain characters that AI image generators can't handle.
당신은 한국어 타이포그래피 전문가입니다. 사용자의 프롬프트를 분석하여 이미지에 렌더링할 핵심 한국어 텍스트 하나와 적절한 폰트 스타일을 결정해주세요.

## 1단계: 텍스트 후보 추출
아래 기준에 해당하는 텍스트를 모두 뽑아주세요.
- 따옴표(큰따옴표·작은따옴표·겹낫표 등)로 감싸진 텍스트
- 고유명사 (브랜드명, 상호명, 제품명, 행사명, 인물명 등)
- 이미지의 제목·헤드라인·메인 카피로 사용될 텍스트

## 2단계: 필터링
추출한 후보를 다음 두 조건으로 필터링합니다.
1. **한국어**일 것 — 한글(가~힣)이 포함된 텍스트만 남깁니다.
2. **복잡하거나 사전에 없는 단어**일 것 — 아래 중 하나 이상에 해당해야 합니다.
   - 획수가 많은 한자어 혼용 단어 (예: 醬, 麵, 饗 등이 섞인 단어)
   - 일반 사전에서 찾기 어려운 조어·합성어·신조어
   - 브랜드명·상호명 등 고유 창작 단어
   - 4음절 이상의 복합 한국어 단어
   - 한글+숫자·한글+특수문자가 섞인 혼합 표기

## 3단계: 최종 선정
필터를 통과한 텍스트 중에서 **가장 이미지의 제목·헤드라인으로 적합한 텍스트 1개**를 선정합니다.
선정 우선순위:
1. 프롬프트에서 제목·타이틀·헤드라인 역할로 명시된 텍스트
2. 따옴표로 강조된 텍스트
3. 가장 길거나 복잡한 텍스트

필터를 통과한 텍스트가 없으면 texts를 빈 문자열("")로 설정하세요.

## 4단계: 폰트 스타일 결정
선정된 텍스트와 프롬프트의 디자인 맥락을 고려하여 폰트 카테고리와 굵기를 결정합니다.
- 포스터·공연·이벤트 → display, bold 또는 black
- 카페·레스토랑·감성 → handwriting, normal
- 비즈니스·기업·공식 → sans-serif, normal 또는 bold
- 럭셔리·프리미엄·전통 → serif, normal
- 코드·기술·데이터 → monospace, normal

## 출력 형식 (JSON만 출력)
```json
{
  "texts": "선정된 텍스트 (없으면 빈 문자열)",
  "fontCategory": "serif|sans-serif|display|handwriting|monospace",
  "fontWeight": "normal|bold|black"
}
```

## 사용자 프롬프트
The LLM returns a JSON result like:
{
  "texts": [
    { "content": "뙤약볕", "role": "headline" }
  ]
}
In NBskills, Planning (identifying design type, purpose, mood, and required content) and Refinement (auto-deriving 11 detailed design specs) are performed before this step. This provides richer design context for text extraction, resulting in more precise style decisions.
Converting Text to Image
The text is typed on a server-side canvas and exported as an image file. This image becomes the text reference passed to the AI in the next step.
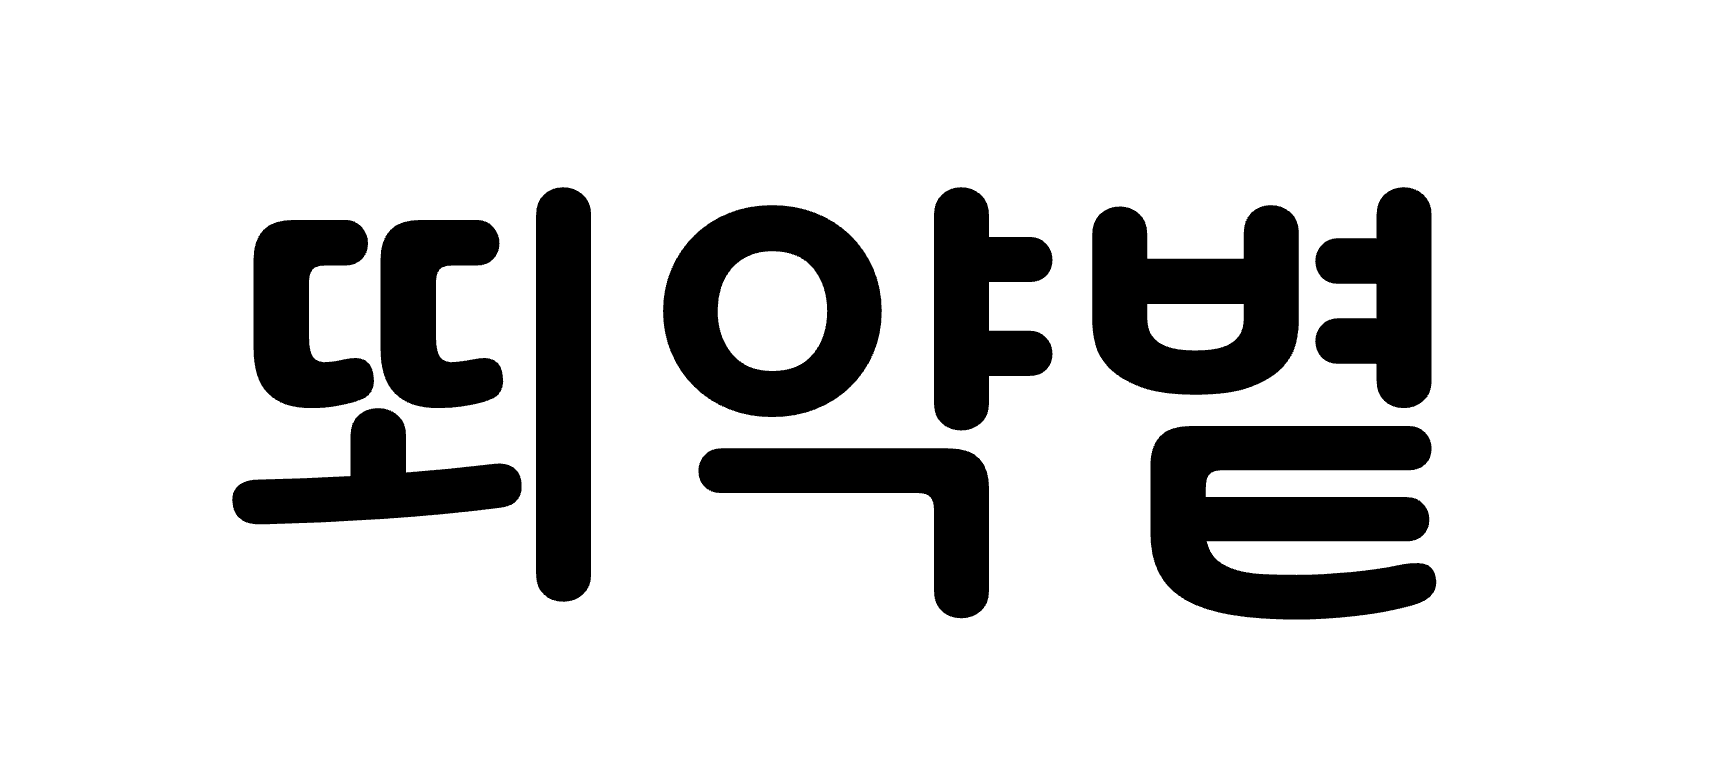
Let's follow the process with the "뙤약볕" example:
i. Language Detection — The Agent automatically detects the language of the text to render.
ii. Font Selection — Design context is extracted from the prompt and conversation, and the optimal font is determined. In this example, Black Han Sans was chosen for its warm feel. The final image generation will build upon this font choice.
iii. Text Typing — The selected font is used to render the text on a Node.js Canvas, producing a PNG image.
Result:
In NBskills, the fontCategory derived during the Refinement step is automatically applied here. Users don't need to manually specify fonts or colors — the optimal combination is applied based on design context.
Final Image Generation
In the final step, the reference image from the previous step is combined with the user's prompt to generate the final image. The following system prompt is used:
당신은 전문 이미지 생성 AI입니다. 사용자의 요청에 맞는 이미지를 생성합니다.


## 중요 지침
1. 첫 번째 참조 이미지는 **로고 이미지**입니다. 이 로고를 디자인의 핵심 브랜드 요소로 취급하고, 디자인 맥락과 레이아웃에 맞는 적절한 위치와 크기로 배치해주세요.
2. 로고의 원본 형태와 비율을 왜곡 없이 유지하되, 전체 디자인과 조화롭게 통합해주세요.
3. 위의 "포함할 텍스트" 섹션에 명시된 텍스트뿐만 아니라, 디자인 목적에 필요한 추가 텍스트(서브 카피, 날짜, 장소, CTA 등)도 적절히 이미지에 포함해주세요.
4. 모든 텍스트는 가독성을 유지하면서 디자인적으로 조화롭게 배치해주세요.

## 사용자 요청
{{사용자 프롬프트}}In NBskills, skill-based prompt enhancement — specialized prompting skills for image generation are automatically loaded and combined into the final prompt — is performed automatically at this stage.
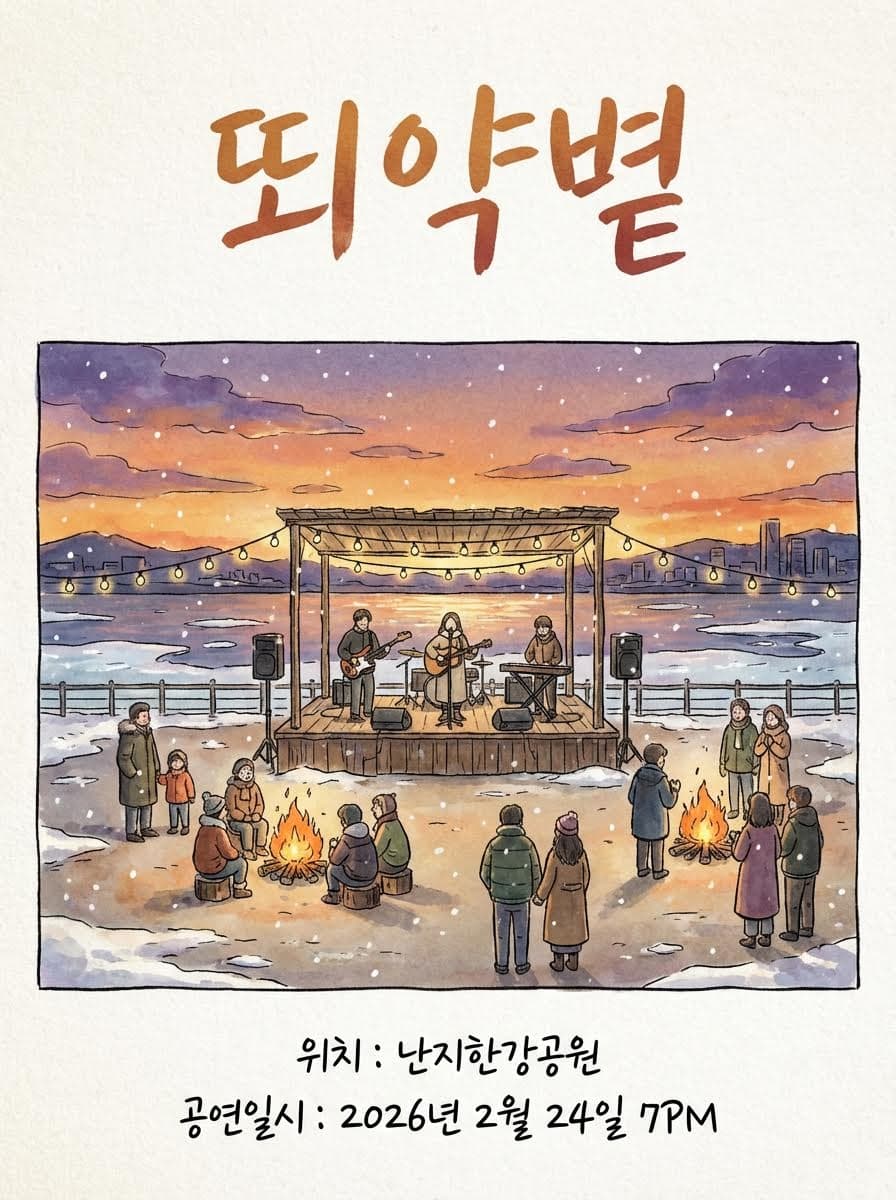
Let's Look at the Results Again:
Unlike before, "뙤약볕" is rendered correctly and the image layout is intact.
5. All of This, Simplified with NBskills
Performing the above process manually requires significant effort. And in reality, it's not enough — beyond accurate text rendering, design planning and detailed spec derivation (Refinement) greatly impact output quality. NBskills automates the entire pipeline.
Planning Is Everything
Many people jump straight to "make me this image" when writing prompts. But great results start with great planning.
NBskills assigns the LLM the role of a Senior Design Director and systematically identifies the design direction across 4 categories:
- design_type — What are you designing? (poster, Instagram feed, YouTube thumbnail, etc.)
- purpose — What's the goal? (grab attention, convey info, drive purchases, etc.)
- mood — What's the vibe? (modern & minimal, warm & friendly, bold & intense, etc.)
- required_content — What must be included? (date, location, logo, etc.)
Items already inferable from the prompt are excluded from questions. For example, if you said "make a poster," design_type won't be asked — only mood and purpose will be queried.
Full Planning prompt:
당신은 시니어 디자인 디렉터입니다. 사용자의 요청을 분석하여, 최종 디자인 스펙을 완성하기 위해 꼭 필요한 질문만 생성합니다.

사용자 요청: "{{사용자 프롬프트}}"

## 당신이 최종적으로 채워야 하는 디자인 스펙 (11가지)
1. targetAudience — 타깃/상황 (예: "20대 여성", "직장인", "투자자")
2. mediaFormat — 매체·사이즈·형식 (예: "인스타 피드(1080×1080)", "A4 인쇄", "PPT 16:9")
3. layout — 레이아웃·그리드 (예: "중앙 정렬 단일 카드", "좌측 이미지 + 우측 텍스트 2단")
4. usageContext — 사용 맥락·환경 (예: "모바일 SNS 피드", "오프라인 매장 진열")
5. typography — 서체·크기·굵기 (fontCategory, fontSize, fontWeight)
6. aspectRatio — 이미지 비율 (예: "1:1", "16:9", "9:16")
7. resolution — 권장 해상도 (예: "1080x1080", "1920x1080")
8. colorScheme — 색상 팔레트 (textColor, backgroundColor, accentColor)
9. mood — 분위기 키워드 (예: "elegant", "playful", "bold")
10. textAlignment — 텍스트 정렬 ("left" | "center" | "right")
11. layoutHint — 레이아웃 방향 ("horizontal" | "vertical" | "centered")

## 사고 과정 (이 순서대로 진행하세요)

### Step 1: 유추 시도
사용자 요청만으로 위 11가지 스펙 각각을 유추해보세요. 확신이 있는 항목과 불확실한 항목을 구분합니다.

### Step 2: 유추 불가능 항목 분석
유추하기 어려운 항목들을 모아보세요. 그리고 "사용자가 어떤 정보 하나를 알려주면, 거기서부터 여러 스펙을 연쇄적으로 유추할 수 있는지" 생각하세요.

예를 들어:
- "어디에 쓰실 건가요?" → mediaFormat, aspectRatio, resolution, usageContext를 한 번에 유추 가능
- "어떤 분위기를 원하세요?" → mood, colorScheme, typography를 유추 가능
- "누가 주로 보게 되나요?" → targetAudience, layout, textAlignment을 유추 가능

### Step 3: 레버리지 높은 질문 설계
하나의 답변으로 가능한 많은 스펙 요소를 유추할 수 있는 질문을 우선으로 선택합니다.
- 질문은 최대 3~4개까지만 생성합니다.
- 질문은 비전문가도 쉽게 답할 수 있는 일상 언어로 작성합니다.
- 각 질문의 선택지는 사용자 요청 맥락에 맞는 3~5개로 구성합니다.
- 이미 유추 가능한 내용은 질문하지 마세요.
- 모든 스펙이 충분히 유추 가능하면 빈 배열 []을 반환하세요.

## 출력 형식 (JSON)
```json
[
  {
    "id": "usage",
    "question": "어디에 쓰실 건가요?",
    "options": [
      { "id": "instagram_feed", "label": "인스타그램 피드" },
      { "id": "poster", "label": "포스터/전단지" },
      { "id": "web_banner", "label": "웹 배너" }
    ],
    "infersSpecs": ["mediaFormat", "aspectRatio", "resolution", "usageContext"]
  }
]
```

## 중요
- 한국어로 작성합니다.
- 질문 id는 질문의 의미를 나타내는 자유로운 영문 snake_case를 사용합니다.
- infersSpecs에는 해당 질문의 답변으로 유추할 수 있는 스펙 이름을 배열로 적어주세요.
This Planning step is the key differentiator in final output quality.
Professional Design Specs via Refinement
After collecting Planning answers, an LLM acting as a Senior Art Director and Typography Expert automatically derives 11 specific design specifications:
- targetAudience — Music fans aged 20–30
- mediaFormat — Poster (A3/A4)
- layout — Full-bleed background with overlay
- usageContext — Offline display + social sharing
- typography — display, xlarge, black
- aspectRatio — 3:4
- resolution — 1080x1440
- colorScheme — Text #FFF, Background #1A1A3E
- mood — Calm yet impactful
- textAlignment — center
- layoutHint — vertical
Even if the user only said "winter feel," the expert LLM infers a cold-toned color palette, serif font family, appropriate resolution, and more. No need for complex prompt engineering on your part.
Expert-Level System Prompts Built In
NBskills comes with built-in prompts for the Senior Design Director, Art Director, and Typography Expert roles introduced above.
Even if you simply say "make a poster," expert-level prompting strategies are automatically applied behind the scenes.
Multiple Tasks in One Place
It's not just text rendering. From a single chat interface, NBskills handles:
- Multilingual text rendering — Korean, Japanese, Chinese, Thai, Arabic, and more
- Character pose changes — Adjust character poses and angles
- General image generation/editing — Create and modify images through conversation
All tasks are processed with skill-based auto-matching that applies the optimal prompting strategy.
Free + Multiple Images at Once
During the current beta period, all features are free. Plus, you can generate up to 10 images simultaneously per request, letting you quickly compare different concepts.
9 Languages Auto-Detected with Font Matching
Beyond Korean, NBskills auto-detects Japanese, Simplified Chinese, Thai, Arabic, Devanagari, Cyrillic, and more — 9 scripts total. The optimal font for each language is automatically selected, with support for RTL (right-to-left) scripts like Arabic.
Iterative Improvement via Multi-Turn Chat
It doesn't have to be perfect the first time. Continue the conversation with requests like "make the text bigger" or "change the background color" for incremental improvements. Previous context is preserved, so you never need to re-explain from scratch.
Auto-Routing to the Latest AI Models
NBskills automatically selects the optimal AI model based on the task type. No need to wonder which model to use — the latest and best is always applied.
6. Conclusion
Multilingual text rendering in AI image generation remains a challenging problem.
But with the unique strategy of "don't let AI recognize text as text — make it recognize text as a logo", you can push the model to its full potential. NBskills automates Korean text rendering and many other prompting techniques, so anyone can achieve research-lab-level results.
Try it now on NBskills — it's free.